

Categories
-
Adhesive Tapes
- Cloth Tape
- Custom Printed & Printed Labels & Tapes
- Double Sided Tapes
- Filament Tapes
- Foam Tapes
- Framing Tape
- Gaffa Tapes
- High Bond Tape
- Masking Tapes
- Packing & Machine Tapes
- Paper Packing Tapes
- Specialty Tapes
- Strapping Tapes
- Tape Dispensers & Tape Guns
- Taping Machines - Tape Dispensers
- Teflon Tape
- Transfer Tape
- Water Activated Tapes & Dispensers
- Bubble Wrap
- Cardboard Boxes, Corrugated & Paper
- Carton Sealing Machines | Case Sealers
- Cold Chain Packaging
- Double Sided Tapes
- Environmentally Friendly Packaging
- General Packaging
- Glue Dots
- Hot Glue Guns & Hot Glue / Glue Sticks
- Heat Sealers | Bag Sealers
- Instapak - Foam In Place Packaging
- Labels and Label Applicators
- Mailing Tubes
- Packaging Machinery
- Padded Mailers, Jiffy Bags and Bubble Mailers
- Pallet Wrappers
- Pallet Wrap & Stabilisation
- Plastic Bags
- Protective Packaging
- Service & Repairs / Servicing Your Packaging Machinery
- Shrink Wrap | Heat Shrink Film
- Shrink Sleeves
- Shrink Tunnels
- Shrink Wrap Machines
- Strapping
- Strapping Machines
- Tamper Resistant Packaging
- Tape Machines and Dispensers
- Used and Second Hand Packaging Machinery
- Vacuum Packaging
- Washroom Products
- Zapak Strapping Tools
Information
-
Posted: 11 June 2026
-
Posted: 11 June 2026
-
Posted: 28 May 2026
-
Posted: 18 May 2026
-
Posted: 7 May 2026
We Recommend
-

Bubble Wrap Rolls - Protective Bubble Packaging
From $119.12
-

Glue Dots - Sticky Dots - GlueDots® Adhesive Produ
From $125.00


Useful Tips for Using Hot Melt Glue Sticks
Author: administrator Date Posted:28 August 2013
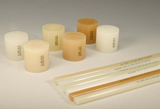
297Before bonding with the molten glue, you must prepare yourself and your surfaces. Firstly make sure you are using protective eye wear and heat resistant gloves, as well as full length sleeves. The aim is to minimise the possibility that molten glue come into contact with exposed skin, hair or eyes. Next, prepare your surface being bonded. It is imperative that the surface is free of contaminants, like dust or water. In some cases it is worthwhile to lightly abrade the surface so that the bond may be improved and with surfaces like metal you will get a better bond if it is pre-warmed up to 95°C. When bonding the surfaces, it is best to apply the glue to the more difficult to bond surface, (generally hard smooth surfaces are more difficult to bond than the more porous surface). Next, after the glue has been applied, mate the two surfaces together as quickly as possible and apply as much pressure as practically possible, making sure the surfaces are not moved or adjusted after contact has been made. This will ensure the best possible bond. As long as it has been bonded correctly then typically you will have achieved approx 50% of your strength after 1 minute, 75% after an hour, and full strength after a full day. For some final tips; “open time” of the hot melt glue will vary depending on a range of factors such as; application temperature; amount of molten glue applied; type of substrate and ambient temperature conditions, and operator application technique. As some glue formulas result in more flexibility or “rubberiness” this can result in difficulty in running them through some hot melt glue guns, especially after idle durations greater than 20 minutes. It is recommended to run these types of products in guns have flexible feeding (inlet) tubes or semi-rigid Teflon feeding tubes – and also to keep idle times down to a minimum.

